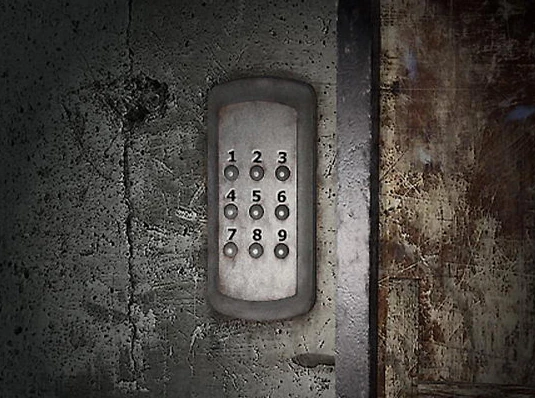
The keypad to unlock the door.
- This article is a guide for a Silent Hill 3 puzzle.
During Heather Mason's trek through Brookhaven Hospital in Silent Hill 3, she comes across a door that must be unlocked using a Keypad. The door leads to the second floor patient wing, and must be solved for Heather to progress through the hospital. The keypad consists of buttons numbered from 1 to 9, and the clues to solving the puzzle are found on a nearby stretcher and chalkboard.
Solution[]
The clues and solutions to the puzzle differ depending on which puzzle difficulty is chosen. The process naturally increases in complexity the higher the difficulty level is set, however, the answer is always a four-numbered sequence.
Easy[]
On Easy difficulty, there is no diary on the stretcher, unlike on the other difficulty levels, and the memo on the chalkboard contains a simple poem. The poem reads:
"Press, move 2 right;
press, move up 1;
press, move 2 down;
press, the door shall open."
The solution to the puzzle lies in guessing the correct number to start with. According to the first line, the initial button must allow the player to move twice to the right, meaning it is 1, 4 or 7. The second line then instructs to move up once, meaning the initial button is 4 or 7. The third line requires two moves down, meaning the initial button is 4.
By starting with 4 and following the directions exactly, the player is left with the final code of 4639.
Normal[]
On Normal difficulty, the player can find a diary from Stanley Coleman on the stretcher pointing to a memo on the chalkboard with the clue to solving the puzzle. The memo reads:
- "The first is larger than the second;
- the second twice the third;
- the third smaller than the fourth;
- the fourth is half the first.
- Four of the numbers are not repeated
- Three are not in the top row
- Two are not in the right row
- One of the numbers is the final key"
According to the first paragraph, the "fourth is half the first", which means that the first number must be even for the fourth number to be a whole number. Since the first number is double the last, and the highest even number is 8, then the first number is 2, 4, 6 or 8, and the last number is 1, 2, 3 or 4. The line "the third is smaller than the fourth" means that the fourth number cannot be 1, and that the third number is therefore 1, 2 or 3. The line above reading "the second is twice the third" means that the second number is either 2, 4 or 6, and the line "the first is larger than the second" means that the first number must be higher than 2, while still being an even number.
The first line of the second paragraph indicates that all of the numbers in the code are unique, and the middle two lines indicate that the code can contain only one number from the top row (1, 2 and 3) and only two numbers from the right row (3, 6 and 9). It is unknown, however, what the last line of the paragraph means, as the words "final key" seem to refer to the number 9, yet, as it happens, the correct code does not contain a 9.
The hints from the first paragraph can be simplified as follows:
- first number: 4, 6 or 8
- second number: 2, 4 or 6
- third number: 1, 2 or 3
- last number: 2, 3 or 4
We can now apply the logic from the second paragraph to reduce these possibilities and deduce the code. Since we know there is no 9 in the code, this means the two numbers in the right row must be 3 and 6. This same 3 also satisfies the requirement of a single number in the top row. The remaining two numbers must come from 4, 5, 7 and 8. We know the code does not contain a 5 or 7, and all numbers in the code must be unique, so the remaining numbers of the code must be 4 and 8. This means the numbers involved in the code are 3, 4, 6 and 8.
From here, we can simply find which position each of these numbers must be at in the code using process of elimination on the first paragraph's hints. Since 8 is only a possibility in the first position, the code must start with 8. Because of this, 6 can now only be in the second position. The only viable number in the third position is 3, which leaves the only viable number in the fourth position as 4.
Thus the solution is found to be 8634.
Hard[]
On Hard difficulty, the player can find a diary from Stanley Coleman on the stretcher pointing to a memo on the chalkboard with the clue to solving the puzzle. The memo is a sadistic poem written to a lover.
The writer is unknown, as is whether it is a real letter or just a very strange way to remember the code. Given the nearby diary from Stanley Coleman stating that the doctor (presumably the same doctor who sexually abused Christie in the special treatment room where there is a nurse enemy, who is probably her) is the one who created the code, the poem is heavily implied to have been written by said doctor, possibly about Christie herself.
It reads:
- "Pure eyes, blue like a glassy bead —
- You are always looking at me
- and I am always looking at you.
- Ah, you're too meek —
- beautiful, unspoiled:
- thus I'm so sad, I suffer —
- and so happy, it hurts.
- I want to hurt you
- and destroy myself
- What you would think
- if you knew how I felt.
- Would you simply smile,
- not saying a word?
- Even curses from your mouth
- would be as beautiful as pearls.
- I place my left hand on your
- face as though we were to kiss.
- Then I suddenly shove my thumb
- deep into your eyesocket.
- Abruptly, decisively,
- like drilling a hole.
- And what would it feel like?
- Like jelly?
- Trembling with ecstasy, I obscenely
- mix it around and around: I must
- taste the warmth of your blood.
- How would you scream?
- Would you shriek "It hurts!
- It hurts!" as cinnabar-red tears
- stream from your crushed eye?
- You can't know the maddening
- hunger I've felt in the midst of
- our kisses, so many of them
- I've lost count.
- As though drinking in your cries,
- I bring my hopes to fruition:
- biting your tongue, shredding it,
- biting at your lips as if tasting
- your lipstick.
- Oh, what euphoric heights I would
- reach, having my desires fulfilled
- like a greedy, gluttonous cur.
- I longed, too, for your cherry-tinted
- cheeks, tasty enough to bewitch my
- tongue.
- I would surely be healed,
- and would cry like a child.
- And how is your tender ear?
- It brushes against my cheek;
- I want it to creep up to my lips so
- I can sink my teeth into its flesh.
- Your left ear, always hearing words
- whispered sweet as pie —
- I want it to hear my true feelings.
- I never lied, no...
- but I did have my secrets.
- Ah, but what must you think of me?
- Do you hate me? Are you afraid?
- As though inviting you to the agony
- at the play's end, if you wish, you
- could destroy me — I wouldn't care.
- As you wish, you may destroy me
- — I wouldn't care."
The ode, sadistic as it may be, is actually a representation of the correct keys and order that must be pressed. The writer pays particular attention to the victim's face, and when the face is roughly compared to the nine keys, the layout of the keypad becomes:
| 1 Right Eye |
2 Nosebridge |
3 Left Eye |
| 4 Right Ear |
5 Nose |
6 Left Ear |
| 7 Cheek |
8 Mouth |
9 Cheek |
Following the writer's graphic imagery, the order in which they taste from the person's "face" is the solution to the puzzle. The player must imagine that they are the writer and that the keypad is the victim's face. If part of the face is mentioned but the writer does not actually taste from it, it should simply be ignored.
- The writer places their left hand on the face (the right side of the victim's face) and digs their thumb into the eye socket, which in this case would be 1. "Cinnabar-red tears stream from your crushed eye", and the writer says they are "...drinking in your cries", meaning they are not tasting from the eye socket, but rather licking tears. In this case, the blood flows down to the number below 1, which is 4.
- The writer says "biting your tongue, shredding it". The tongue is located in the mouth, which in this case is the number 8.
- The writer says "...cheeks, tasty enough to bewitch my tongue", thus the next number must either be 7 or 9.
- They mention the victim's "tender ear" and are then "sinking [their] teeth" into it. They reveal it was the left ear, which refers to 6.
After putting the clues together, the correct combination will either be 4876 or 4896, and after guessing and checking for the correct third number, the proper sequence is found to be 4896.