Template:Infobox SH monster
- For the Bogeyman in Silent Hill: Homecoming, see Pyramid Head.
The Bogeyman is an antagonist who appears in Silent Hill: Downpour. He served as Murphy Pendleton's personal tormentor, akin to that of Pyramid Head or the Butcher, though not as exclusively as the latter two. Murphy encounters him several times throughout his trek through Silent Hill, menacing him on numerous occasions. Beyond Murphy, the Bogeyman was also known to haunt Anne Marie Cunningham, in which she was directly confronted by the monster during the climax of the story. He wields his Hammer and follows Murphy and Anne relentlessly.
The Bogeyman also appears in the spin-off game, Silent Hill: Book of Memories. He stalks the protagonist everywhere and is temporarily invincible whenever he is clouded by darkness.
Appearance
The Bogeyman appears as a massive humanoid, towering over every other humanoid in the game. His huge frame is housed in a heavy black raincoat, with his face completely obscured by an S10 gas mask, which is reminiscent of toxic radiation suits. He also wears heavy rubber boots and thick rubber gloves. The Bogeyman's coat has several chains, studs, and stitches adorning it. He doesn't have any immediately recognizable deformities or torture implements in his appearance, unlike almost every other monster in the series—at least none that can be seen with his obscuring coat. The Bogeyman's signature weapon is a massive sledgehammer, which appears to be made from a cinder block at the end of a elongated fire axe handle.
Character
The Bogeyman's behavior is that of pure menace, plodding around with his massive hammer and intimidating stature. His movements are slow and deliberate, yet always conveying a kind of ruthless brutality. He is also shown to be a relentless murderer, going so far as to snap a child's neck with one hand, while making a "hush" gesture towards the horrified Murphy. The Bogeyman's raw strength is also impressive, able to lift a grown man with one hand and fling him across the room. This strength is even more dangerous with his sledgehammer in hand, as he is able to outright kill even the toughest monsters with one slow, but mighty swing. He is also able to send out strangely accurate shockwaves that travel great distances, as well as destroy surrounding architecture.
Silent Hill: Downpour
The Bogeyman is first directly seen during one of the Centennial Building Otherworld's Void chase scenes, walking down a hallway that is also Murphy's only escape route. The Bogeyman turns to glance at him just in time for the floor to collapse and Murphy to plummet to another part of the Otherworld. The Bogeyman's bellowing cry is also heard several times throughout the exploration of both the Otherworld and the Fog World, usually accompanied by a tremor.
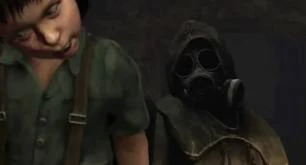
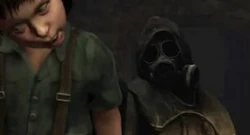
The Bogeyman holding the boy.
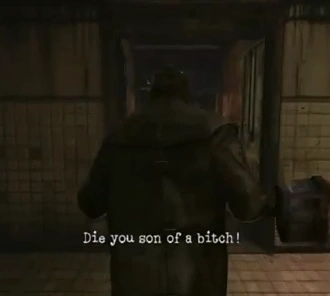
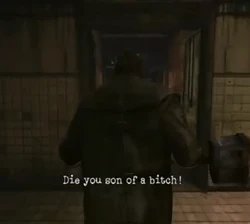
Murphy comes face-to-face with this creature once again after collecting a poem to ward off "the Bogeyman", as specified by a young boy resembling Murphy's son Charlie. The boy seems oblivious to the titan as Murphy struggles to recite the poem from memory, having to stop to scream profanity at the Bogeyman as his memory fails him. The Bogeyman lifts the boy up, watching Murphy closely, as if he is waiting for him to finish the poem, but snaps the boy's neck with one hand before the last verses could be said, making a "shush" gesture with his hand before walking away.

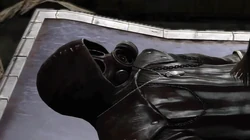
The Bogeyman on the gurney.
The Bogeyman is seen several times throughout the Orphanage's Otherworld sequence, destroying the environment as Murphy gives chase to a mysterious girl to protect her from the masked giant. Despite the Bogeyman confronting Murphy several times to impede his progress, Murphy awakes from the Otherworld in the chapel morgue. The nun there asks Murphy to sign for his son's dead body, to which Murphy claims he buried Charlie years ago. The nun yanks the sheet off the huge mass, revealing a seemingly comatose Bogeyman with the key to DJ Ricks's boat, "Freedom" on a chain around his neck. Murphy has a breakdown, admitting to having screwed up badly, before finally trying to take the keys. The Bogeyman springs to life, grabbing Murphy and hurling across the room, causing him to awake in what seems to be his old house.

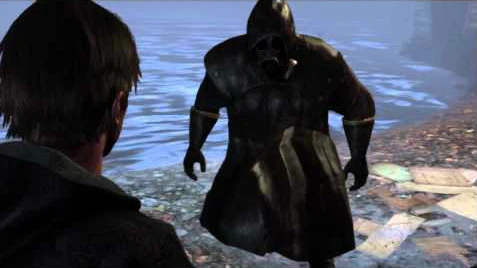
Murphy's fight with the Bogeyman.
Murphy hears Charlie's cries for help before running down to the lake shore, only to find the Bogeyman rising out of the water. A brief confrontation occurs, Murphy finally staggering the giant and smashing his head in with his own sledgehammer. Murphy awakes back in the morgue, the Bogeyman's mask now gone, revealing a face that switches Murphy and Napier's likenesses between light flickers. Murphy laments his son's death, but a vision of Charlie congratulates him on his defeat of the Bogeyman and tells him not to blame himself for his death, however Murphy sadly admits that Napier's death really didn't accomplish anything, the exact opposite he thought his vengeance would achieve.
Murphy as the Bogeyman in the finale.
Murphy himself never sees the Bogeyman again, but during a confrontation with Anne it is revealed that she sees Murphy as a human-sized version of the raincoat-clad killer. During the conversation Anne shoots Murphy in the shoulder, apparently causing him to black out. The player then gains control of the once-again gigantic Bogeyman, who has abandoned all likenesses of Murphy's personality. During the fight he tries to defeat Anne, who maintains a steady stream of pistol fire and opens the nearby cells, releasing some Prisoner Juggernauts to aid her, though they each die with one swing from his hammer. One ending is obtained if the player lets Anne defeat the Bogeyman, which requires a degree of passivity on the player's part due to the Bogeyman's massive quantities of health.
Should the Bogeyman defeat Anne however, he hoists his sledge up for the killing blow, and the player has one last choice: whether to kill or spare Anne, which then directly affects the ending received.
Symbolism
Unlike Pyramid Head and the Butcher, the Bogeyman does not represent the desire to be judged, instead manifesting itself as the desire to judge others, namely those responsible for Anne's father and Murphy's son's deaths.
As such, the Bogeyman is literally just that—a ruthless monster—in the eyes of those who see him. He is the embodiment of what is known in social psychology as the "fundamental attribution error." To Murphy, the Bogeyman is Napier, but to Anne, the Bogeyman appears to be Murphy.
Its presence is due to a character's lack of personal accountability and short-sightedness. The Bogeyman is an illusion created from the perceptions of the individual to rationalize their own crimes and misdeeds by placing the blame on the "Bogeyman" rather than themselves. When Murphy realizes that his actions made him a "Bogeyman" as well, he is able to take accountability for himself and defeat his version of the Bogeyman, retrieving the "freedom" key in the process. This is evidenced by the final stanza of the Bogeyman nursery rhyme: "Take heed, it's not too late. Mistakes needn't haunt you forever. Though you have regret, you can't just forget. You alone decide your fate."
He also could represent destruction brought about by revenge, as the relentless pursuit of vengeance can become just as destructive to oneself as that which caused the revenge-seeking behavior in the first place:
- Murphy sees the Bogeyman as the "true monster" because he wants to believe that his choice to brutally murder Napier, and his subsequent deal to murder another man, was admissible or heroic. Interestingly enough, Murphy admits after seeing the dead Bogeyman's face that his vengeance didn't actually solve anything in the end.
- The same can be said for Anne Cunningham when she witnesses Murphy transform into the Bogeyman in one of the final scenes in the game. Anne believes that Murphy is responsible for murdering her father, and envisions him as the Bogeyman to justify her intention to murder him, as well as the "sick things" she had to do in order to have Murphy transferred to her prison in the first place.
The Bogeyman Rhyme
Poor little Steven Skelter
Even the chaplain won't forgive you.
Forever lies, your pleading cries
But Suzy knows you felt her.
Nowhere left for you to run,
Every fault laid bare in the open.
Along with your skin, splayed out from within,
Once the monster has his fun.
Take heed, it's not too late,
Mistakes needn't haunt you forever.
Though you have regret, you can't just forget,
You alone decide your fate.
Trivia
- The Bogeyman's mask is based on the British S10 NBC Respirator used by the SAS special forces regiment, with the circular front cover turned upside down like its successor, the FM12.
- In the first floor of the clock tower, there is a hole in the wall that can be examined. Inside the hole, there is a little flashback with shadows that shows Bogeyman hitting someone with his sledgehammer. The flashback is actually Murphy (being represented as the Bogeyman) killing Napier.
- The Bogeyman is the first and so far only playable monster in the Silent Hill series, save for Alex Shepherd's alternate costume in Silent Hill: Homecoming which portrays him as a Pyramid Head.
- Unlike Pyramid Head and the Butcher, the Bogeyman does not drag his weapon across the ground.
- Throughout the game, Murphy's radio will emit distorted vocalizations along with the ordinary white noise; the audio, although overall difficult to decode, becomes more decipherable when in St. Maria's Monastery after Murphy first sees the Bogeyman in the bathroom mirror. Some of these sounds include what appear to be: "It's the Bogeyman!," "He's comin'!", and "He's gonna get'cha!" The voices are most audible during times of great tension in the game.
- The Bogeyman shares its name with the Silent Hill: Homecoming version of Pyramid Head. Although their names are the same, any further similarities are minuscule.
- The Bogeyman's appearance is related towards the eastern Mediterranean legend of the Babau, which is portrayed as a tall man wearing a long, heavy black coat, with a black hood or hat to hide his face.
Gallery
")
")
")
")
")
")
")
")
")
| v · e · d |
|---|
| Characters |
| Anne Marie Cunningham - Murphy Pendleton - George Sewell - Frank Coleridge - Bobby Ricks - Howard Blackwood - John P. Sater - M. Koons - Freddie Gates - Mark Cunningham - Leonard B. Trent |
| Monsters |
| Bogeyman - Doll - Leonard B. Trent - Nurse - Prisoner Minion - Screamer - Tormented Soul - Weeping Bat - Wheelman |
| Locations |
| Centennial Building - Devil's Pit - Lakeview Hotel - Overlook Penitentiary - Room 302 (South Ashfield Heights) - Ryall State Prison - Silent Hill - Toluca Lake |
| Terms |
| Fog World - Monster - Otherworld - Real World |
| Creators |
| Tom Waltz - IDW Publishing |